Pizza and Cinnamon Rolls

Perfect Pizza

One of the books on food i’ve enjoyed most over the last couple of months has been ‘Heston Blumenthal – In Search of Total Pefection’. It combines his two series looking for the best possible version of several classic dishes. The recipes occasionally use unusual ingredients, but tend to steer clear of specialist equipment (no sous vide or centrifuges needed). I’ve dabbled with the burger recipe before, but the first one i’m following end to end is the pizza.

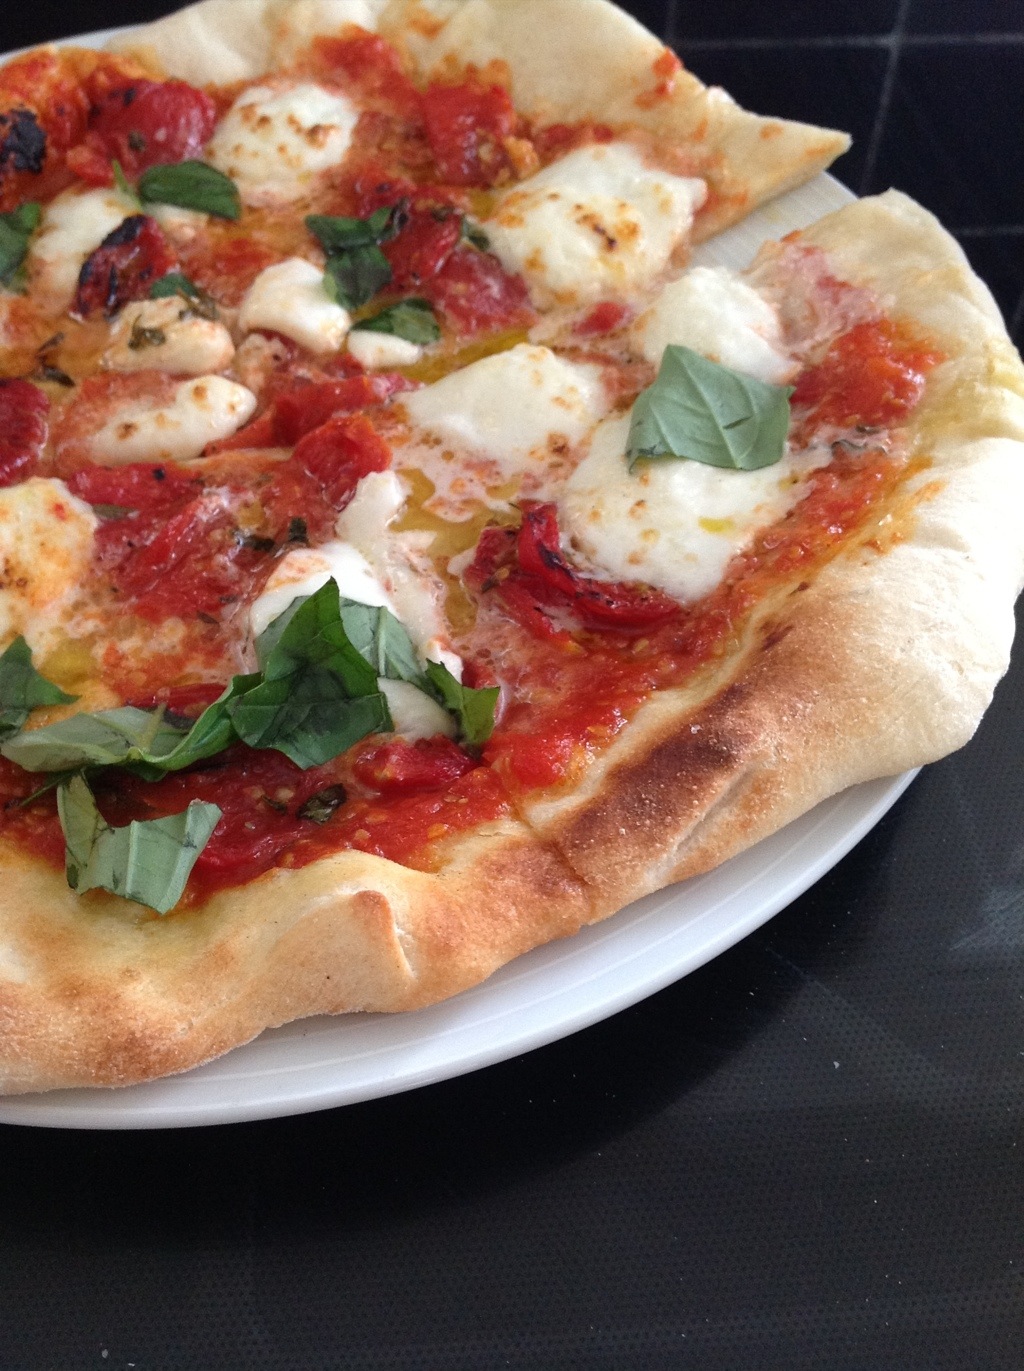
Heston’s idea of a perfect pizza is a simple Neapolitan-style margarita – a tomato sauce, smeared over a thin, crisp base with mozzarella on top.

The Base

The dough is made in two stages, an initial pre-ferment and a final double raise. You make a small batch of dough one day in advance, then make the ‘final batch’ using that pre-ferment as a starter. 00 Grade pasta flour is used to get a really high protein content while keeping a light texture and malt syrup (available from health food shops) is used to boost the sugar content evenly. The dough is left to rise in the fridge so it genereates a lovely sourdough style flavour before being punched down and raised a second time.

The Sauce

The tomato sauce is made from really ripe cherry tomatoes – skinning 45 small tomatoes is a bit of a chore, but the resulting reduction is gorgeous – nothing is added, it’s just pure tomato.

The Toppings

Oven dried tomatoes (dried with garlic, bay, thyme, basil and a little sugar) add individual bursts of intense tomato sweetness, a perfect example of Heston’s flavour encapsulation. Buffalo mozzarella adds a gorgeous creamy contrast and smoked sea salt, extra virgin olive oil and fresh basil finish it off beautifully.

The Cooking

The real magic is the way it’s cooked. Heating a large iron/carbon steel frying pan over a hob over a very high heat for at least 15 minutes means it’s smoking hot. You then flip it over and place it under a grill, also set to high, as close to the element as possible. Leaving it for another few minutes reaches a peak temperature far hotter than a domestic oven. Carefully sliding the pizza inbetween cooks it in around 90-120 seconds and results in a beautifully light puffy crust with a gentle char. Perfect.

20120722-204431.jpg

Cinnamon Rolls

I’ve always loved making bread dough – there’s something deeply satisfying about watching it rise happily and the smell is incredible. After seeing several good recipes for American style ‘cinnamon rolls’ I decided to have a crack.

20120723-200128.jpg

The texture is lovely – fresh out the oven it was warm and pillowy. The smell as it cooked was incredible. I’m not sure how well they age – I didn’t have enough icing sugar on hand to glaze them there and then, so I had to put them in a Tupperware overnight. The days after they were slightly firmer, but still yum. It’ll be interesting to see what people at work think of them tomorrow – fingers crossed!

Sous Vide Spark

Sous Vide, ‘Under Pressure’ in French, is the biggest revolution in cooking in the last fifty years. It involves sealing food inside a plastic bag and placing it in a water bath, kept at a precise temperature, for a prolonged period of time. It’s being used by chefs from Heston Blumenthal to Thomas Keller, Gordon Ramsay to Wylie Dufresne and cuisines from Asian to Molecular Gastronomy. But why?

Because ‘Sous Vide’ is so precise, there is no risk of overcooking. Food is the perfect temperature. Because the bags are sealed, nothing can escape and the flavour molecules can’t dissovle in anything, creating a very intense flavour. Slow cooking ensures that complex protein molecules break down slowly, creating incredibly tender meat and fish. A final benefit is that of convenience, the food can be cooked in advance, stored in it’s airtight bag and reheated as needed.

So why isn’t everyone doing it? There are a number of downsides. One of the major barriers is that people just aren’t familiar with it. My Mum was horrified at the idea of cooking meat at ‘low’ temperatures. Due to the chefs that use it, it’s also seen as complicated or difficult. Another issue is that of caramelisation. Because the food doesn’t get hot enough to allow ‘Maillard Reactions’ (that lovely browning you get on meat) to happen, everything ends up looking rather pale – this can be overcome with the judicious application of a blowtorch or red hot pan. Perhaps the biggest problem though is price – a typical domestic Sous Vide machine will cost around £500 and you’ll also need to buy a vacuum sealer and bags (around £100+)

Keen to get involved in the Sous Vide craze, but unable to afford a proper machine, I decided to follow many other amateur chefs and build my own – time to break out the soldering iron!

A sous vide machine is deceptively simple. You need a vessel to hold the water, a way of heating it, moving it around to ensure it’s an even temperature, measuring that temperature, and controlling it. The actual ‘control logic’ is a little more complicated and requires some clever PID tuning. Rather than start from scratch I bought an ‘Ember Kit v2’ from the lovely people at Lower East Kitchen which provides almost everything you need. You just have to assemble the kit and supply a reservoir and a method of heating it (coffee urns are very popular). I’m deviating slightly due to the fact that my kitchen is tiny, so an ‘immersion circulator’ solution makes more sense while I iron out the kinks. The next generation of the ‘Ember’ is currently sitting on Kickstarter, if you’re interested in an affordable sous vide solution, but don’t fancy the DIY route – give the Nomiku a look!

An exciting package duly arrived from America, complete with all the components neatly bagged up. I downloaded the instructions, setup my soldering iron, and set too. If you have any experience of electronics, it’s very easy to follow and the end result looks great. The board is beautifully made, with all the values printed on it to make component placement easy. The ‘multi-layer’ design means that there’s little risk of scratching an all important track. The instructions were easy to follow, and the only error was due to my own incompetence (soldering the screen on the wrong side) a quick order to Farnell and, for a few pence, the replacement screens arrived the next day, along with the socket and power cable I was going to use.

20120703-081937.jpg

On a rainy Monday evening I finally put it all together and gave it the first ‘test drive’. The system worked beautifully – the water heated to temperature within a few minutes and the Ember Kit held it at the correct temperature with a scary accuracy – over half an hour it never wavered more than 0.1C from the target.

20120703-081645.jpg

20120703-081655.jpg

This weekend i’ll be putting the kit through it’s paces, cooking a variety of established dishes, as well as trying out a few of my own. I’ll be posting the full details of my Sous Vide setup shortly in another post – more soon!

20120703-081704.jpg

Back in Britain

After the gorgeous weather of California, the depressing drizzle of London came as a bit of a shock. The only solution? Food.

MEATmarket

A spin-off of the fantastically popular MEATliquor, MEATmarket is situated in the heart of Covent Garden, overlooking the market. It’s a great place to sit and people watch while chowing down on a variety of gourmet burgers, fries and milkshakes. Their ‘dead hippy burger’ combines two beef patties with a delicious creamy sauce. The burger was almost too juicy, being a real challenge to eat – there’s kitchen roll on each table for a reason! The chips were excellent and very reminiscent of ‘In’n’out burger’ in the US. The milkshake was wonderfully decadent – I like them thick enough that the straw doesn’t fall over and you can’t spill it easily.

20120620-104618.jpg

MEATmarket on Urbanspoon

Cooking

Inspired by their excellent cookbook, I decided to attempt one of Momofuku’s signature dishes: pork buns. Their take on the chinese/japanese/korean classic of ‘char siu bao’ combines a soft clamshell bun, pickled cucumber, slow braised pork belly, spring onions, hoisin sauce and sriracha.

Making the buns from scratch is time consuming, but relatively easy, it’s a pretty straightforward white bread mix that’s then steamed. The pork needs to be home cured overnight and then cooked for hooours. The actual assembly time is very short, making a great dinner party starter.

The end results were far better than I expected, the buns were soft and fluffy, the pork was sweet, porky and had a lovely crunch at the edges. The pickled cucumbers were really nice, cutting through the sweet hoi sin sauce. The sriracha is rocket fuel – use with caution.

20120620-104725.jpg

Oatmeal and Raisin Whoopie Pies

Today’s baking adventure was an ‘Oatmeal and Raisin Whoopie Pie’, with the recipe provided by the lovely people from Outsider Tart. Their shop in Turnham Green and cookbook “Baked in America” are both fantastic.

20120401-193214.jpg

The pies taste great, but didn’t rise as much as I’d hoped. The second batch, which had been chilled in the fridge for two hours, rose slightly better but still wasn’t perfect. Definitely needs more work!

‘Ben’s Cookies’ do a fantastic oatmeal and raisin cookie with a lovely rich, doughy texture. Definitely something to aim for!